OBJECT
The object of the prototype railroad is to efficiently and cost effectively move cargo to a destination specified by the customer. For we model railroaders the object is to move cars in a manner that closely emulates the prototype. There are two major issues to address for this to happen. One issue is controlling car/cargo movements. The other is arranging for motive force to move the cars once we know where the cars are going.
CAR CARD/WAYBILL SYSTEM
Model railroaders do not have actual customers requesting empty cars to be filled or for full cars to be moved. Therefore, many, if not most, model railroads operations use a car card/waybill system to generate freight revenue traffic. That takes care of the rolling stock portion of operations.
For motive force, many operators use the timetable/train orders method, some run all trains as extras running only by train order authority, some with railroads set in the 1980’s and beyond use a train warrant system and others just run their trains randomly with no sense of order. There are also computer programs that generate switch lists, but they are very cumbersome to setup properly. Bill’s railroad is set in the era of timetable/train order control. While train orders running all trains as extras could control movement, the intensive communications required between a dispatcher and each conductor/engineer team pretty much rules out that choice.
Car Cards
Car Cards are a means employed to identify, locate, and track cars, but they do not specify where the car is going or what it is carrying. Most layouts setup for operations have car card boxes at each yard and at each industrial siding/spur. The ideal is to have at least one compartment for each track on which cars can be set out.
Waybills
The engine (pun intended) that drives the operating session is the Waybill. It specifies where and how (“route” & “via”) the car is headed (important) and what it is carrying (not as important). Some versions of waybills also specify where a car is coming from, but that is irrelevant information and makes those waybills more difficult to read.
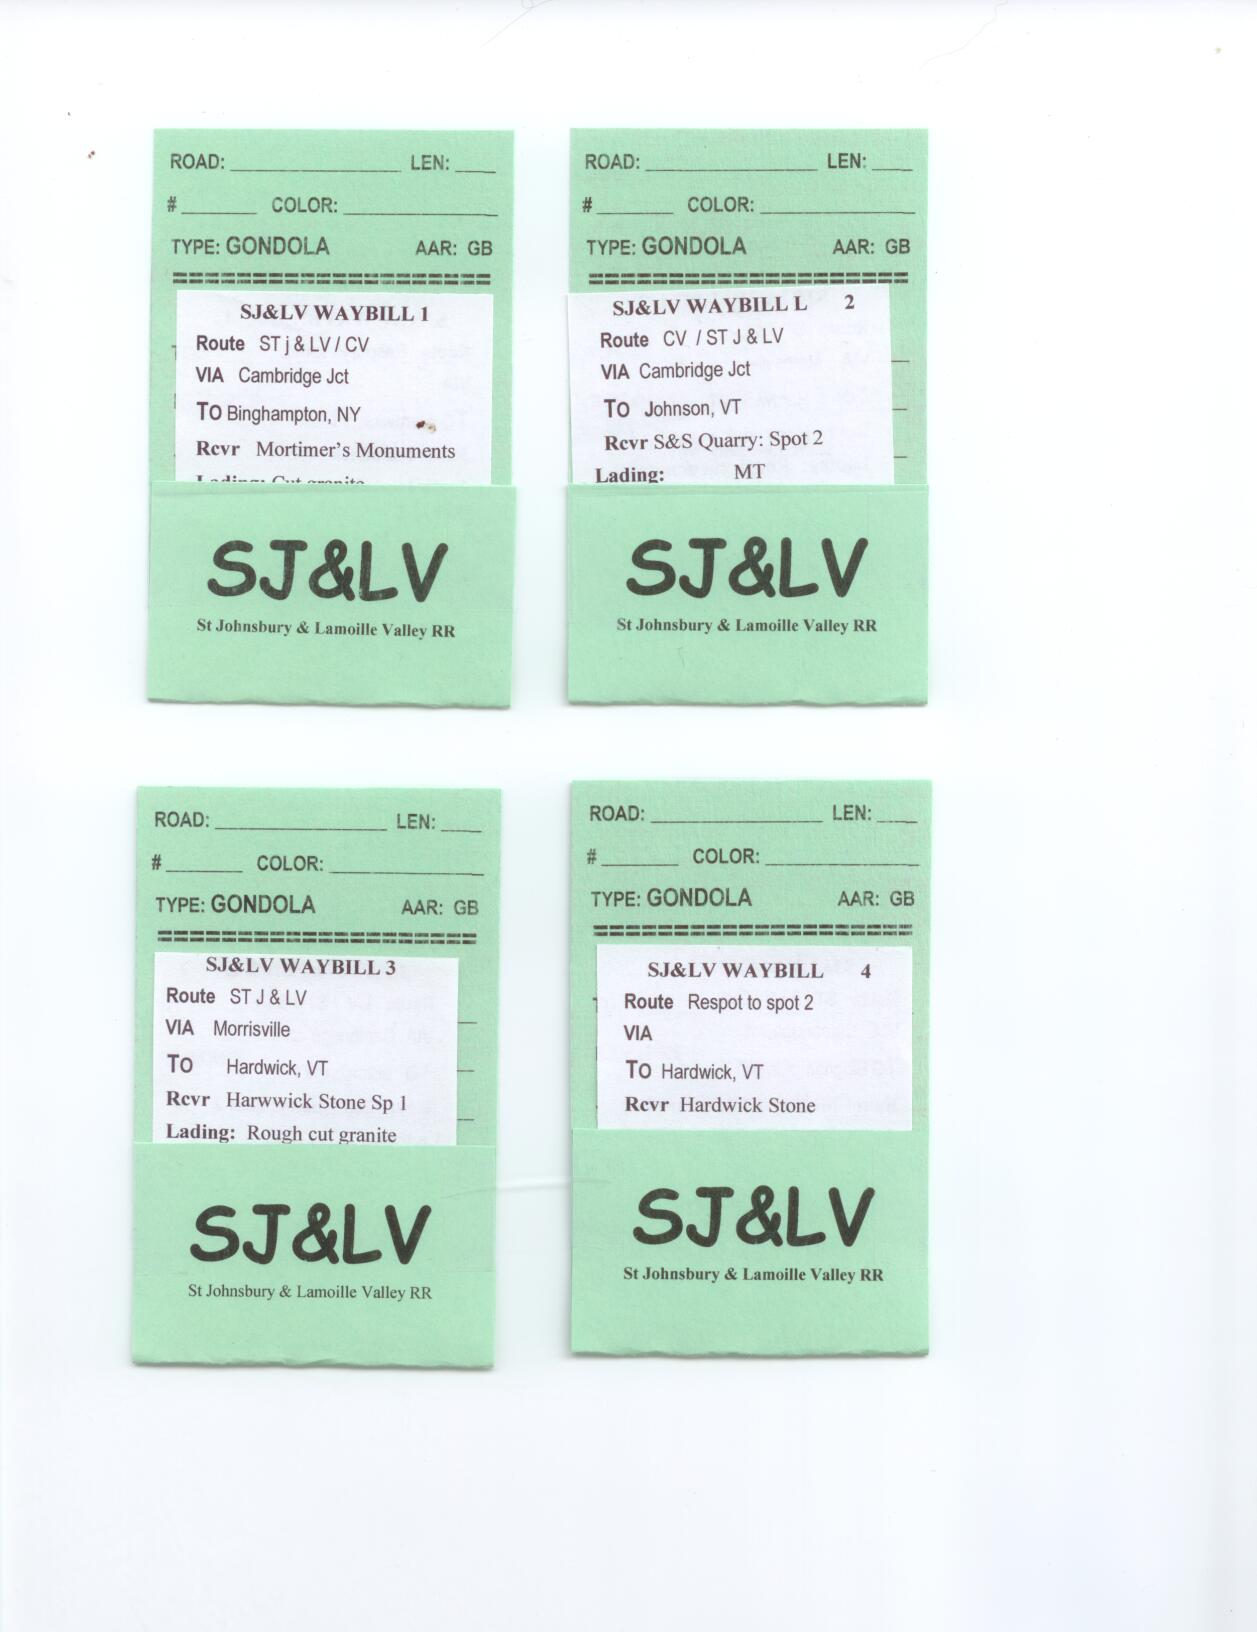
The most common waybill is the 4-cycle waybill (see figure 1 below). Once a car has reached the destination specified on the waybill it will sit in position until the waybill is changed to expose a different cycle. If it is left, it can be treated as a “Hold” that is waiting to be emptied or loaded.
Keep in mind that a cycle need not be completed during a single operating session, only if it reaches the specified destination. Of course, the waybill can still be cycled between sessions at the owners discretion.
EXAMPLE
Below is a sample of a simplified 4-cycle waybill (simplified, in that it does not specify the shipper name or location) for a gondola (or “block” of gondolas) assigned for movement of granite. Additional copies of this waybill can be associated with any number of gondolas. Let’s assume that Bill allocates 12 gondolas for granite service on the SJ&LV and at the beginning of an operating session has 3 of them assigned to each of the 4 cycles and spotted in four locations as follows:
Cycle 1: Starts with car(s) spotted at Hardwick Stone as outgoing “finished granite” loads. These will be heading toward Binghampton, NY and will be considered delivered and Cycle 1 complete once they are set out on the interchange track in Cambridge Jct. The St. Johnsbury-Morrisville “turn freight” is tasked with dropping them off at Morrisville. There they will be picked up and moved west when the next St. Albans-Morrisville “turn freight” heads back to St. Albans (Cambridge Jct. is as close to Binghampton, NY as Bill has modeled. If these cycle 1 cars do not make it to Cambridge Jct in the first operating session, they will resume their trip in subsequent session(s). The car(s) remain at cycle 1 until they ultimately reach Cambridge Jct.)
Cycle 2: Starts with empty (MT) car(s) spotted at Cambridge Jct. These empty gondolas (MT) will be picked up by the St Albans-Morrisville “turn freight” and will be spotted at S&S Quarry in Johnson, VT. (This movement will occur, IF the “turn” job is run during this session, because one of the tasks of the “turn” crew is to move any cars on the Cambridge Jct interchange track for which the car card/waybill indicates that the car(s) are moving east as the “turn” heads toward Morrisville. Cycle 2 should be completed in one session as the quarry is not far from Cambridge Jct.)
Cycle 3: Starts with car(s) spotted at S&S Quarry as outgoing “rough-cut granite” loads. These cars will be picked up during the same stop of the St Albans-Morrisville “turn freight” that drops off the empty (MT) “Cycle 2” cars. As part of this “turn” they will be brought to Morrisville where the next St. Johsbury-Morrisville “turn freight” will continue them on their way toward Hardwick Stone where they will be left at the incoming spot(s) . (Again, this cycle may not be completed in one operating session.)
Cycle 4: Starts with empty (MT) car(s) spotted at the Hardwick Stone incoming spots(s). On the next occasion that the St. Johnsbury-Morrisville “turn freight” works Hardwick Stone these empties will be respotted to the outgoing spot(s) after any full loads have been pulled. (As you may have surmised, these empties will be loaded with “finished granite” and the waybill will be set back to Cycle 1 before the next operating session. And, the cycle starts again.)
Scroll down below scanned image to continue narrative
Figure 1
As you can see from the above, even though there are only four possible movements specified on each 4-cycle waybill, a car’s entire journey may take many more operating sessions before it begins repeating. With many cars taking varying numbers of sessions before starting over, a natural randomness is introduced into the traffic pattern. It becomes highly unlikely that any one operating session scenario will be repeated in subsequent sessions. And, even if a scenario is repeated, at the age most of us are at, we would not remember anyway.
Another aspect of the randomness factor in the gondola example above is that there will be operating sessions during which there may be no outgoing loads waiting at S&S Quarry or empty gondolas at Cambridge Jct., etc. With fewer stops during some runs, trains will take less time, running closer to schedule, to reach their destinations. This will result in potential “meets” with different trains at different places, thereby introducing further randomness. (Did I mention HAZARD CARDS?)
Some cars may complete their cycling if fewer than four cycles. For example, a unit coal train will take full loads to a destination in one cycle and return in a second cycle as empties. Cycles 3 and 4 can be left blank.
Waybills for boxcars, reefers, covered hoppers, tank cars, and any other cars with unseen cargo will usually have no need for related destinations at each cycle. For example:
A boxcar spotted at Stratton Paper with Cycle 1 specifying a load of copy paper heading for New York City via St. Albans would complete Cycle 1 once the car reaches St. Albans. Cycle 2 for the same boxcar could specify a load of furniture that is headed to Plymouth, NH via St. Johnsbury. Once the car is sitting in the yard at St. Johnsbury, Cycle 3 might indicate an empty required at Kos Lumber, and so on. While external loads make for visual interest, they do add to the preparation work by the operating session host.
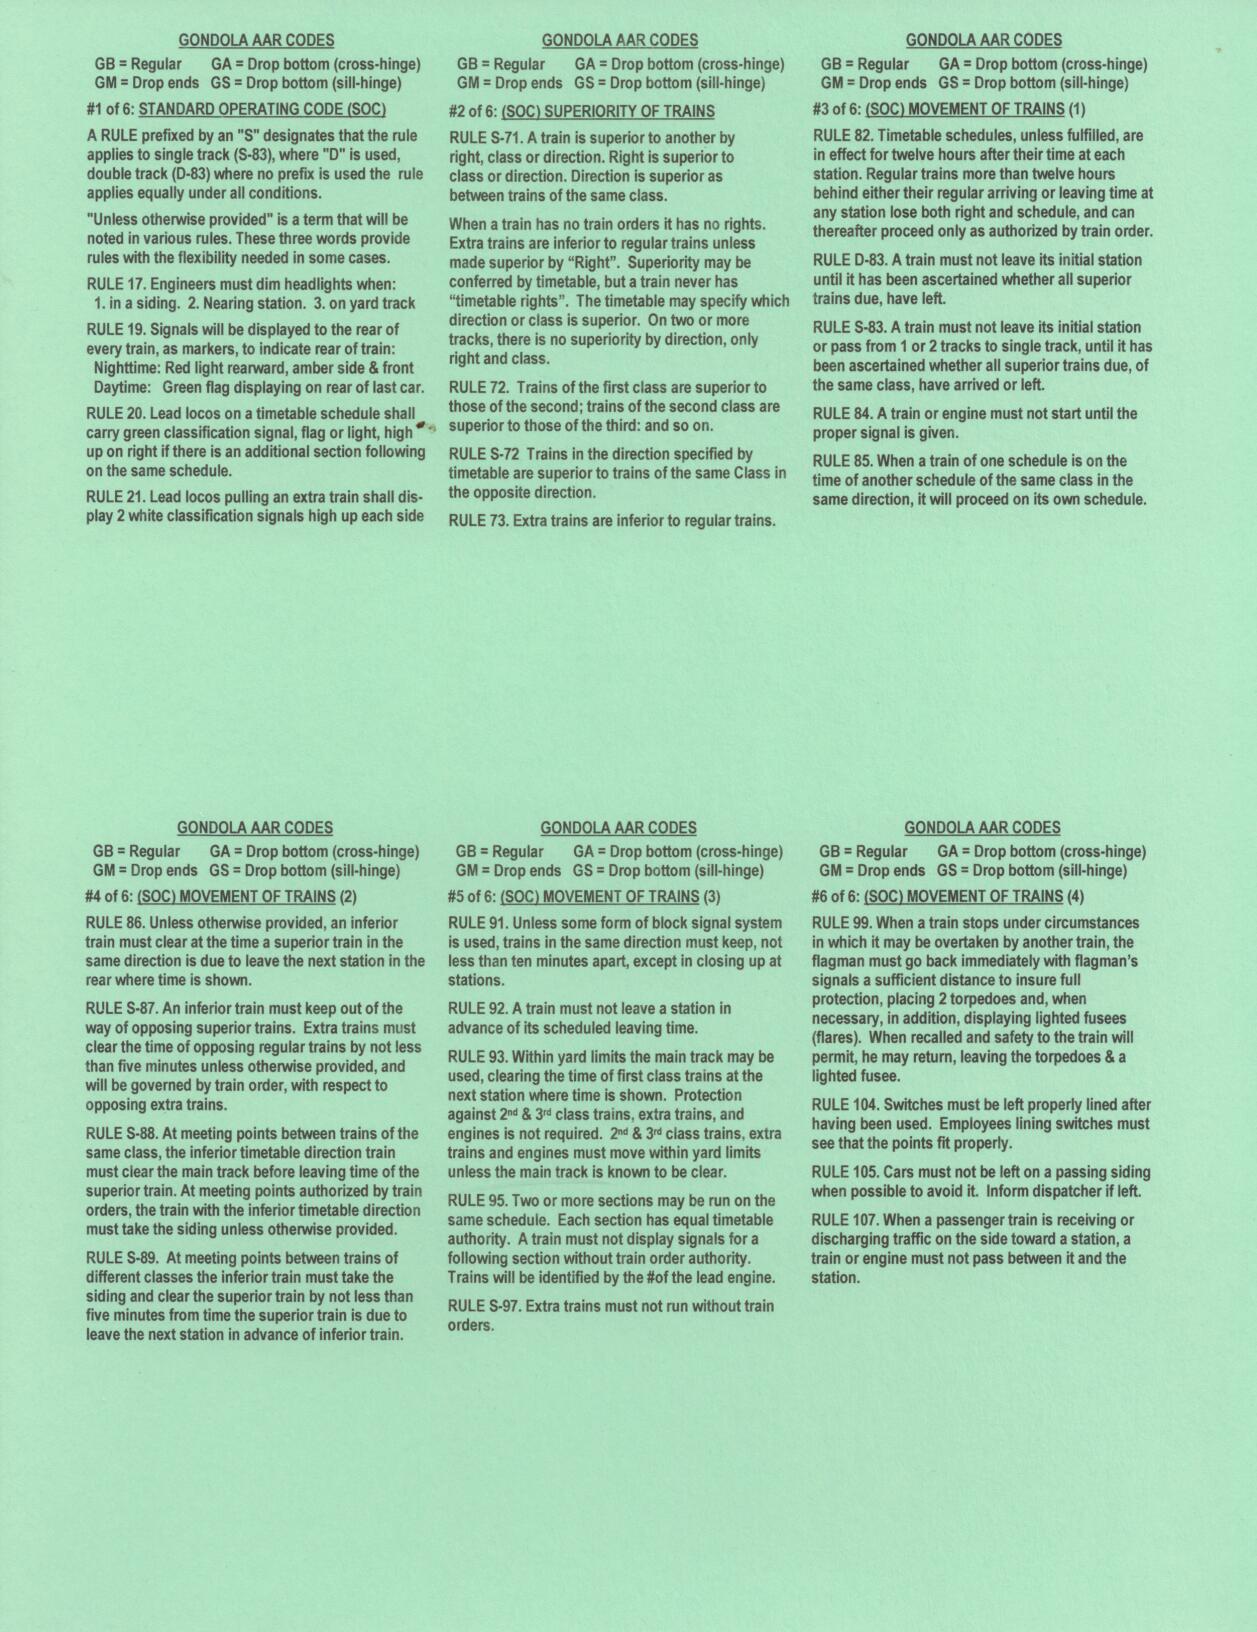
I put selected AAR Codes and many of the Standard Operating Code Rules on the back of the car cards. Each printed sheet (65-pound card stock or 67-pound cover stock from Staples) holds six car cards. The six card backs on each sheet each have different rules listed. You only need to refer to them until you have the entire operating code memorized. (It will be on the test!) Listing the car type and the AAR code may seem redundant, but, if a “conductor” or “yardmaster” chooses to make up a Switch List (see Switch List on another page under the “Sample Forms” heading), the AAR Code is used in lieu of trying to fit the entire car type designation in the small space allotted on the Switch List.
Figure 2
Some members of our group are putting a photo of each car on its corresponding car card. Great Idea! I may adopt this strategy and replace the RR operating marks (SJLV in the samples above) with a photo. Depends on how much effort is involved getting the photos from my Lotus Notes RR db sized and into Microsoft Word.
A couple of months later…
It turns out that pasting most photos into word is extremely easy as they properly size themselves 95% of the time into each table cell. Once in a while a photo needs to be tweaked to the correct proportions. This is easily accomplished by “grabbing” a corner and moving it until the photo looks natural.
The following files are printed on “Cover Stock” one at a time. The first file is printed on one side of the paper. Then the paper needs to be turned over to the other side and printed with the same side to the top. The paper is then put back for a third pass through the printer with the reverse side upside down. I use a paper cutter to separate the six resultant car cards but scissors can also be used. The separated cards are then folded so that the bottom is lined up with the “………………………”‘s part way down side one. This forms the waybill pocket and places the photo near the bottom front with the car specs. at the top. The AAR codes and rules are visible on the reverse side of the card.
CAR CARD__RULES – Tanker – Gray
A couple of years later…
I noticed that this page is accessed frequently and assume that some folks may be using the above files. In case anyone is wondering why the first and third files (above) contain ” – Gray” as part of the file name, it is because I use a different color of card/cover stock (available from Staples) for each car type. Since the AAR codes are different for each car type, the files for the AAR code/Rule printing are include below. Here are the colors I use (followed by the files) if you should choose to color-code your car cards:
RED Boxcar
FUSCHIA Flatcar
LIGHT ORANGE Hopper, Open
DARK ORANGE Hopper, Covered
YELLOW Reefer
LIGHT GREEN Gondola, Open
DARK GREEN Gondola, Covered
BLUE Not currently used (possibly for MOW cars)
VIOLET Stockcar
GRAY Tanker
BEIGE Not currently used (possibly for specialty, e.g. Schnabel, etc.)
CAR CARD__RULES – Boxcar – Red
CAR CARD__RULES – Flatcar – Fuschia
CAR CARD__RULES – Hopper – Open Light Orange
CAR CARD__RULES – Hopper, Covered – Dark Orange
CAR CARD__RULES – Reefer – Yellow
CAR CARD__RULES – Gondola – Open Light Green

Great site. Just a line to update the link to” Ryal Side Railroad Society (RSRS)” it is now
LikeLike